Tuesday, December 6, 2011

Spicy green beans "Bang Bang Beans"


Being Korean, I love spicy food. I've had to scale back on the spiciness because I've developed some ulcers and get heartburns. But I still love to make these spicy green bean now and then. My hubby calls it "Bang Bang Beans" because they are like these beans Browns Restaurants used to have on their menu (or may still).


What you need:

  • Black bean sauce

  • Oyster sauce

  • Shiracha hot sauce

  • Minced garlic

  • Oil

  • Blanched green beans

  • Bowl filled with ice water


I don't measure the sauce because it really comes down to your preference and how spicy you want them to be. That's the cool thing about cooking. Most times you can be as creative as you want and don't have to follow the recipe word for word.

Blanche the green beans by boiling them in salted boiling water for about 3 minutes. Pour the hot water out and place the boiled green beans in a bowl of ice water. This will stop them beans from cooking further and ensure that they stay green and crisp.

Heat the wok on a medium to high heat. Spread vegetable oil evenly on the bottom. Put the minced garlic in and fry it until it is fragrant. (Be careful not to burn them.)

Put the blanched green beans in and cover them with oyster sauce,shiracha hot sauce and stir fry them on high heat for about 5-10 minutes, so they get coated evenly with the combined sauce and garlic.

Serve them hot alongside rice or noodles.

Thursday, November 17, 2011

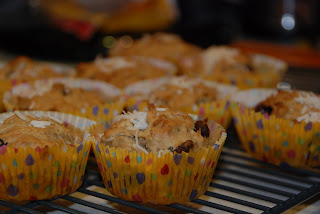
Chocolate coconut banana muffin


I don't crave chocolate all the time but there are times when I crave something sweet. And today I craved chocolate and coconut.
I LOVE coconut. And chocolate and coconut combo is a big hit with me.
And I had planned on baking banana loaf anyway I thought it would be awesome to have all three together. If you are reading this and salivating, you need to try this recipe.

I looked for chocolate coconut banana muffin and this is the best one I found. There were other recipes but lot of them called for self rising flour and I didn't have any at home. But apparently after looking up what the difference between self rising and all purpose flour is, I found out that I can easily making self rising flour from a regular flour by mixing in baking soda and salt to the flour.
 But this has to be done precisely for it to work. If I am ever in need of a self rising flour I know what to do next time.

Getting back to the muffin, I used frozen bananas instead of fresh ones. I always have a one or two bananas that are too ripe whenever I buy bananas and instead of chucking them out, I save them by tossing them into the freezer. I also put in 2 tablespoons of sour cream because I had little bit left in the fridge that i didn't want to waste and thought they might make the muffins more moist. I am not sure if it made any difference but they sure tasted good to me.

DRY:
1 1/2 cups of all purpose flour
1/2 tsp of baking soda
1/4 tsp of salt

WET:

1 egg
1/2 cup sugar
6 tablespoons melted butter
2 Tbsp. Sour cream
3 ripe bananas
1/2 cup medium sweet chocolate chips
1/2 cup unsweetened coconut flakes


Beat the butter and the sugar first until it is thoroughly mixed. Add egg and mash in the bananas. Add the chocolate chips and coconut.
Add the dry ingredient into the wet and mix. Don't over mix at this point.


Divide it into the muffin cups and bake at 350F for 30 minutes. This produced 13 muffins using this recipe.

They are not too sweet and so delicious. You can easily substitute coconut for other dry fruits if desired.

Wednesday, November 16, 2011

Apple Crisp


It's autumn when the leaves shed their green colour and take on hues of red and yellow. And of course it is also the season of apples. Did you know that there are over 7000 kinds of apples in the world? ( I just googled it and I knew it was a lot but didn't expect 7000). My favourite variety are the Fuji apples. They are uber sweet and juicy. My next favourite are the galas because they are not as expensive as the Fujis and they taste sweet like the Fujis.

The idea to make apple crisps stemmed when I bought a bag of gala apples at Costco. I usually don't like to buy produce there but their apples never failed me, not so far.

They are so simple and easy to make, however, depending on how much you are making, you may need to devote couple hours to the oven. I made a whole bag, 6 lbs., of apples. They can burn quite easily if not carefully monitored and since I like them little bit more crispy, I had to keep checking on them to make sure they weren't getting burnt.


THINGS NEEDED:

Apples
Mandolin slicer (I think this is a must tool for this because you want the apple slices to be even and not too thick so they bake evenly)
Cinnamon
Brown sugar
Cookie sheet
Parchment paper or silicon mat


I turned oven on at 325F. And I put the timer on for 30 minutes because I wanted them to be crispy and crunchy. You want them to be crispy, not burnt. If they take on a hint of brown, take them out immediately.

They were so good. I experimented with powdered ginger and nutmeg and I didn't like either of them. I am going to stick with brown sugar and cinnamon for now. I may experiment with different spices at another time if I feel like it.

The only problem with making them is that I kept eating them while I was making them. My plan to pack a bag for my hubby for tomorrow may be in jeopardy because of me. Uh oh. I better restrain myself.

Tuesday, November 15, 2011

Homemade Teriyaki Sauce


I was browsing through Pinterest when I came across this awesome Teriyaki recipe. This is a pretty simple recipe using basic ingredients you can find around the house. There are few things on the recipe that you do need to seek out such as Mirin which can be easily found at an Asian market and star anise. I didn't bother with star anise when I was making the sauce at home because I didn't have it available at home.
Even without the star anise, it tasted fantastic and it is great because there is no MSG and you know what goes in the sauce. Until now I've bought different brands of teriyaki sauce from groceries and some were too sweet and some were too salty. I never found the perfect sauce and it always makes you wonder how much MSG they put in the sauce. With this recipe, you can customize it and add or subtract ingredients as you go and you get the satisfaction knowing that there is no MSG in it.

TERIYAKI SAUCE from Ang Sarap.
I've made tiny modification from the original recipe. And I also like to double the recipe to make extra for the rice.

1 cup water
3 Tbsp Soy sauce
2 Tbsp Sweet vinegar or Mirin
1 Pc Star Anise
1 Tbsp Sesame oil
2 Tbsp Red sugar/Raw sugar (I just used brown sugar because I didn't have any raw sugar)
1/2 Tsp. Ground black pepper
2 Thin slices of ginger
2 Cloves garlic, minced
1/2 Small onion, don't chop.
1 Tbsp corn starch, dissolved in 1/4cup of cold water.

Feel free to add or take out things as you go along depending on your preference.

Method (Teriyaki Sauce)

1. In a sauce pan mix all ingredients together except for the cornstarch and bring to a boil.
2. Once boiling, add cornstarch mixture, simmer until the consistency is thick.
3. Remove star anise, ginger and onion from the sauce, then set aside.


Best pizza dough recipe


The other day, my husband and I were out shopping. I have been eyeing this pizza stone at Cookworks and since they were having 20% off sale, I thought this was the perfect time to get one. Once we get there though, I forgot completely about the pizza stone and almost didn't purchase it. But I remembered at the last minute and somehow I managed to convince my hubby that we needed a $50.00 dollar pizza stone. I told him that I was going to make him an awesome pizza once we got it.

I love making pizza at home from scratch. Yes, it is time costuming because you have to make the dough and wait for it to rise. Anytime there is yeast involved, it takes time. But you can always make a big batch and freeze the dough for later use. Home pizza feels healthier. I am not sure if it saves you money since you can get $1.50 pizza slices and if you are single, making a pizza at home doesn't really make sense. However, if you do have the time to make them, home made pizza gives you a sense of pride knowing that you are going that extra mile to be healthy. Plus I love the feeling of a dough under my hands; the ones that are soft and supple to touch and you can manipulate it easily.

And I have used this pizza dough recipe few times and I love it. It's from Foodnetwork's Tyler Florence. I usually get 2 9" crusts using this recipe.

PIZZA DOUGH:

1 package of active dry yeast (2 1/4 Tsp if you buy in bulk)
1 Tsp of sugar
1 C Warm water
1 Tbsp. Kosher salt
2 Tbsp. Extra virgin oil
3 Cups of flour ( I found 2 1/2 cups to be optimal)
Italian seasoning

In a bowl of a standing mixer fitted with dough hook, combine the yeast, sugar and warm water; stir gently to dissolve. Let it stand until the yeast comes and starts to foam, about 5 to 10 minutes. You can see the yeast bubbling and come "alive".

Turn the mixer on low and add the salt and 2 tbsp. of olive oil. Add the flour little bit at a time. Like I mentioned in the recipe, I use about 2 and half cups of flour in all. It's always easier to add more flour than take away the flour. I also add Italian seasoning at this point. When the dough starts to come together, increase the speed to medium. You can get a feel of the dough by touching it. If it feels soft and non sticky, it's close to being done. Mix until the dough gathers into a ball, this usually takes about 5 to 10 minutes.

Turn the dough onto a lightly floured surface. Fold it over few times until it feels smooth and elastic. Put the dough into a lightly oiled bowl and turn it over so you get oil on the dough. Cover with plastic wrap or a damp paper towel and let it rise in a warm spot for an hour until doubles in size. If you live in a colder region, I suggest you put it in the oven with temperature set at 100 - 150 F or another trick I use is putting a hot water in a bowl underneath the greased bowl and I warm up couple tea towels in the dryer beforehand and use them to cover the dough. I made a mistake of assuming that the dough was going to rise one time and it never did. I've heard of people put it by the dryer that is turned on or on top of the fridge.

Roll the dough and divide it into either 2 or 3 pieces depending on how big you want your crust to be. Spread little bit of olive oil on the edge of the crust and top it with the pizza sauce and any toppings you desire. Bake it for about 15 minutes, depending on how crispy you want it to be.

I stick my pizza stone in to heat it up at 500 F. It produces a nice brown crust and it is uber delicious.
If this is your first time making a pizza dough at home, this is a great recipe to use.

Monday, November 14, 2011

Gluten free Chocolate coconut pie


When I saw this awesome recipe on how to make coconut crust chocolate pie, I was thrilled. I love coconut and combined with chocolate, this was heaven on a pie plate.

And I had a perfect excuse to make this pie when my mother-in-law came over for dinner. She has celiac and isn't supposed to eat gluten. She ignored this up until few months ago because she loved bread and all the things that contains gluten and who doesn't? Long story short, I wanted to make this pie for her since the pie crust is made of coconut, not flour therefore making it a gluten free dessert.

This pie is super easy to make. This recipe is from Sweet Twist of Blogging

Recipe:

CRUST
6 cups of shredded unsweetened coconut
1/4 cup + 1 tbsp. of softened unsalted butter
1/4 cup granulated sugar

Preheat the oven to 350F. In a food processor, process butter and one-third of coconut and sugar until mixture forms a ball or starts to stick together, 1 to 2 minutes. Transfer to a medium bowl. Combine this mixture with the remaining two-thirds coconut using your hands to bring together the coconut.


FILLING
1 cup heavy cream
8 ounces of bittersweet chocolate, finely chopped (60% cacao) I used medium sweet chocolates because I didn't have any bittersweets on hand and it tasted good. Next time I am going to try making it with bittersweet chocolates though.

Press coconut mixture into bottom and up sides of pan to form crust, leaving top edges loose and fluffy. Cover the crust lightly with tin foil over the edges, and cut a hole in the center. Keeping the edges covered to prevent burning. Bake until center begins to brown, 10 to 15 minutes; remove foil and bake until edges are browned, 4 to 5 minutes more. Transfer crust to a wire rack to cool completely.

Make the filling: In a small sauce pan bring cream just to a boil. While cream is heating up, place chopped chocolate into a medium heatproof bowl. Pour the cream over the chocolate and let sit for 10 minutes to allow chocolate to melt. Stir to combine and melt remaining chocolate. The mixture should be smooth and completely melted. Pour into coconut crust. Refrigerate until filling is set, 1 hour or up to 1 day.


I didn't have to use 6 cups of the coconut. I used about 3.5 cups of coconut and that was sufficient. And I used medium sweet chocolate instead of bittersweet chocolate because I didn't have any.

This pie is decadent and perfect for that time when you are craving chocolate. And combined with coconut, it totally tastes like Bounty chocolate bar.

The dinner went really well. I cooked chicken teriyaki with rice thinking that it was gluten free. WRONG! Next day, we get a call from mother-in-law asking what kind of soy sauce I used to make the sauce for the teriyaki. I take a look at the ingredients on the soy sauce container and second ingredient listed is Wheat. Alas, who knew? I certainly didn't. My carefully well planned gluten free meal didn't quite turn out as I wanted it to.


At least, the dessert turned out fabulous.

I will write another post with this great Teriyaki sauce recipe I found. So easy to make and way better than the ones you buy in store.